CSS Selectors 101: Targeting Elements with Precision
Master CSS selectors from basics to advanced. Learn element, class, ID, group, and descendant selectors with practical examples. Build a solid foundation for styling web pages.
11 min read
Share
- Why Are CSS Selectors Needed?
- Without Selectors
- With Selectors
- Understanding How Selectors Work
- 1. Element Selector
- Syntax
- Example
- HTML
- Common Element Selectors
- 2. Class Selector
- Syntax
- Example
- HTML
- Multiple Classes
- 3. ID Selector
- Syntax
- Example
- HTML
- Class vs ID: When to Use Which?
- Rules of Thumb
- 4. Group Selectors
- Syntax
- Example
- Real-World Example
- 5. Descendant Selectors
- Syntax
- Example
- HTML
- Deep Nesting
- Combining Selectors
- Element + Class
- Element + ID
- Multiple Classes
- Descendant + Class
- Selector Priority (Specificity)
- Priority Order (Lowest to Highest)
- Example
- Before & After: Styling Examples
- Example 1: Navigation Links
- Example 2: Card Component
- Selector Cheat Sheet
- Common Mistakes to Avoid
- Mistake 1: Missing Dot for Classes
- Mistake 2: Missing Hash for IDs
- Mistake 3: Space in Combined Selectors
- Practice Exercises
- Summary
- Key Takeaways
- Conclusion
You've written some HTML. Great! Now you want to make it look good. But here's the question every beginner asks:
"How do I tell CSS which element to style?"
The answer: Selectors.
CSS selectors are the foundation of all styling. Master them, and you can style anything with precision.
Why Are CSS Selectors Needed?
Imagine you're in a crowded room and you need to get someone's attention. You could:
- Shout "Hey you!" – Everyone looks (not ideal)
- Say "Hey, person in the blue shirt!" – A few people look
- Call out "Hey John!" – Only John responds
CSS selectors work the same way. They help you target specific elements without affecting others.
Selectors are addresses
Just like a postal address helps mail reach the right house, CSS selectors help styles reach the right elements.
Without Selectors
/* This would style EVERYTHING - chaos! */
* {
  color: red;
}
With Selectors
/* Only paragraphs inside articles turn red */
article p {
  color: red;
}
Understanding How Selectors Work
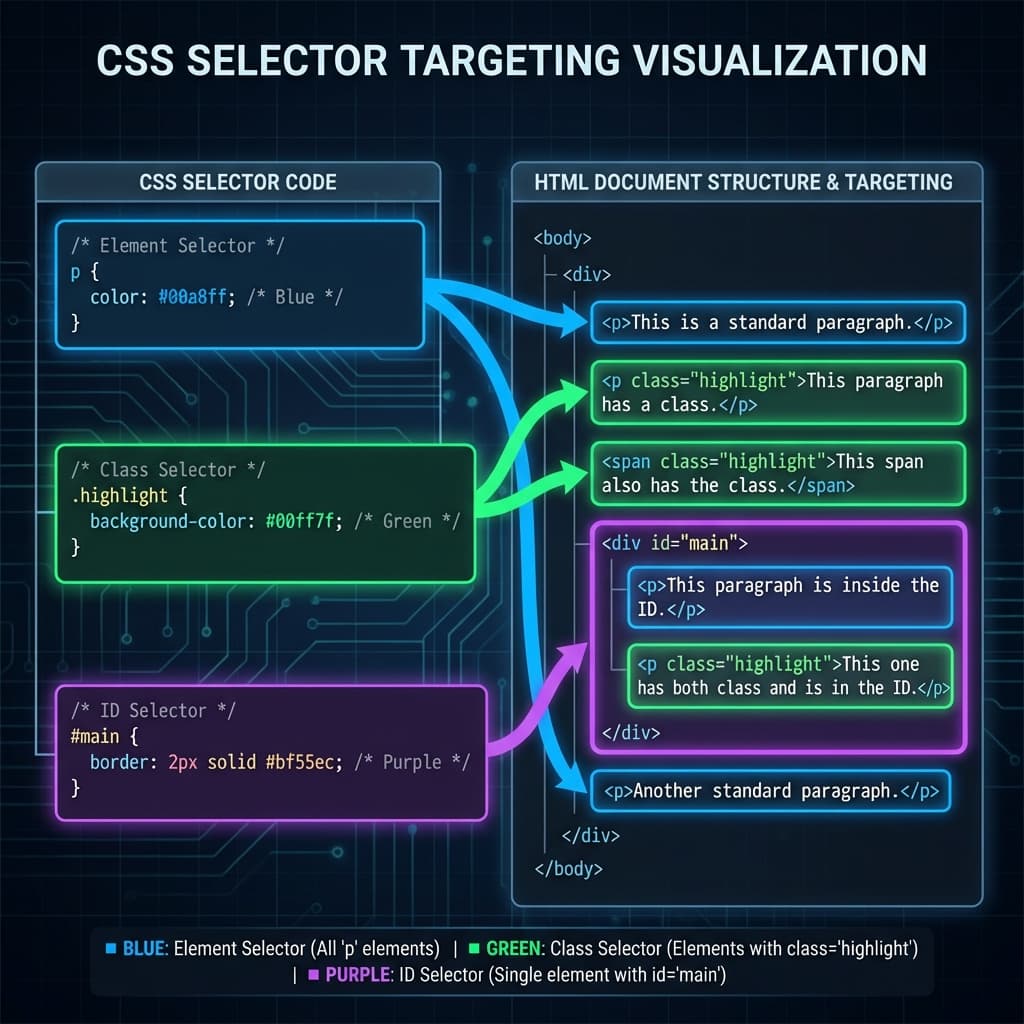
CSS selector targeting flow showing how different selectors target HTML elements
CSS selectors follow a simple pattern:
selector {
  property: value;
}
The selector tells the browser what to style. The property and value tell it how to style.
1. Element Selector
The most basic selector. Target elements by their tag name.
Syntax
tagname {
  /* styles */
}
Example
p {
  color: #333;
  line-height: 1.6;
}

h1 {
  font-size: 2.5rem;
  font-weight: bold;
}
HTML
<h1>This heading is styled</h1>
<p>This paragraph is styled</p>
<p>This paragraph is also styled</p>
Tip
Element selectors style ALL elements of that type on the page. Use them for global base styles.
Common Element Selectors
| Selector | Targets |
|---|---|
p | All paragraphs |
h1 | All h1 headings |
div | All div containers |
a | All anchor/link elements |
img | All images |
ul | All unordered lists |
button | All buttons |
2. Class Selector
Target elements by their class attribute. Uses a dot (.) prefix.
Syntax
.classname {
  /* styles */
}
Example
.highlight {
  background-color: yellow;
  padding: 4px 8px;
}

.card {
  border: 1px solid #ddd;
  border-radius: 8px;
  padding: 20px;
}
HTML
<p class="highlight">This is highlighted text</p>
<p>This is normal text</p>
<div class="card">This is a card</div>
Multiple Classes
Elements can have multiple classes:
<div class="card featured">Featured Card</div>
.card {
  border: 1px solid #ddd;
}

.featured {
  border-color: gold;
  background: #fffbeb;
}
Classes are reusable
The same class can be applied to many elements. This is what makes classes so powerful – write once, use everywhere.
3. ID Selector
Target elements by their id attribute. Uses a hash (#) prefix.
Syntax
#idname {
  /* styles */
}
Example
#main-header {
  background: #1a1a1a;
  color: white;
  padding: 20px;
}

#submit-button {
  background: #22c55e;
  color: white;
  font-size: 1.1rem;
}
HTML
<header id="main-header">Site Header</header>
<button id="submit-button">Submit Form</button>
IDs must be unique
Each ID should only appear once on a page. If you need to style multiple elements the same way, use a class instead.
Follow a single rule from stylesheet to painted pixel:
1/4
Class vs ID: When to Use Which?
 CSS Class vs ID selector comparison showing one-to-many vs one-to-one relationships
| Feature | Class (.) | ID (#) |
|---|---|---|
| Prefix | . (dot) | # (hash) |
| Uniqueness | Can repeat | Must be unique |
| Use case | Reusable styles | Unique elements |
| Priority | Lower | Higher |
| Example | .btn, .card | #main, #footer |
Rules of Thumb
- Use classes for most styling (90% of the time)
- Use IDs for unique page sections (header, footer, main)
- Use IDs for JavaScript targeting and anchor links
- Never use the same ID twice on a page
4. Group Selectors
Style multiple selectors with the same rules using commas.
Syntax
selector1, selector2, selector3 {
  /* styles */
}
Example
/* Without grouping - repetitive */
h1 {
  font-family: 'Inter', sans-serif;
  color: #1a1a1a;
}

h2 {
  font-family: 'Inter', sans-serif;
  color: #1a1a1a;
}

h3 {
  font-family: 'Inter', sans-serif;
  color: #1a1a1a;
}
/* With grouping - clean! */
h1, h2, h3 {
  font-family: 'Inter', sans-serif;
  color: #1a1a1a;
}
Real-World Example
/* Reset default margins on common elements */
body, h1, h2, h3, p, ul, ol {
  margin: 0;
  padding: 0;
}

/* Style all form inputs consistently */
input, textarea, select {
  border: 1px solid #ddd;
  border-radius: 4px;
  padding: 8px 12px;
}
Tip
Group selectors are perfect for resetting styles and applying consistent base styling across similar elements.
5. Descendant Selectors
Target elements that are inside other elements. Uses a space.
Syntax
parent child {
  /* styles */
}
Example
/* Only paragraphs INSIDE articles */
article p {
  line-height: 1.8;
  margin-bottom: 1rem;
}

/* Only links INSIDE the navigation */
nav a {
  text-decoration: none;
  color: #333;
}
HTML
<article>
  <p>This paragraph is styled</p>
  <div>
    <p>This nested paragraph is also styled</p>
  </div>
</article>

<p>This paragraph is NOT styled (outside article)</p>
Deep Nesting
Descendant selectors work at any depth:
/* Links inside list items inside navigation */
nav ul li a {
  color: white;
}
Don't go too deep
Avoid selectors like div div div p span. They're fragile and slow. Keep it to 2-3 levels max.
Combining Selectors
You can combine multiple selector types for precision:
Element + Class
/* Only paragraphs with class 'intro' */
p.intro {
  font-size: 1.2rem;
  font-weight: 500;
}
Element + ID
/* Only the header with this specific ID */
header#main-header {
  position: sticky;
  top: 0;
}
Multiple Classes
/* Elements with BOTH classes */
.card.featured {
  border: 2px solid gold;
}
Descendant + Class
/* Cards inside the sidebar */
.sidebar .card {
  padding: 12px;
}
Selector Priority (Specificity)
What happens when multiple selectors target the same element?
CSS uses specificity to decide which styles win.
Priority Order (Lowest to Highest)
| Priority | Selector Type | Example |
|---|---|---|
| 1 (Low) | Element | p, div, h1 |
| 2 | Class | .card, .btn |
| 3 | ID | #header, #main |
| 4 (High) | Inline style | style="..." |
Example
p {
  color: blue;        /* Priority: 1 */
}

.intro {
  color: green;       /* Priority: 2 - wins over element */
}

#special {
  color: red;         /* Priority: 3 - wins over class */
}
<p class="intro" id="special">What color am I?</p>
<!-- Answer: RED (ID has highest priority) -->
Don't overthink it
For now, just remember: ID > Class > Element. We'll dive deeper into specificity in a future post.
Before & After: Styling Examples
Example 1: Navigation Links
Before (unstyled):
<nav>
  <a href="#">Home</a>
  <a href="#">About</a>
  <a href="#">Contact</a>
</nav>
CSS:
nav {
  background: #1a1a1a;
  padding: 16px;
}

nav a {
  color: white;
  text-decoration: none;
  margin-right: 20px;
}

nav a:hover {
  color: #f97316;
}
Example 2: Card Component
Before:
<div class="card">
  <h3 class="card-title">Card Title</h3>
  <p class="card-text">Card description here.</p>
</div>
CSS:
.card {
  background: white;
  border: 1px solid #e5e7eb;
  border-radius: 12px;
  padding: 24px;
  box-shadow: 0 2px 4px rgba(0,0,0,0.1);
}

.card-title {
  font-size: 1.25rem;
  font-weight: 600;
  margin-bottom: 8px;
}

.card-text {
  color: #6b7280;
  line-height: 1.6;
}
Selector Cheat Sheet
| Selector | Syntax | Targets |
|---|---|---|
| Element | p | All <p> elements |
| Class | .card | Elements with class="card" |
| ID | #main | Element with id="main" |
| Group | h1, h2, h3 | All h1, h2, and h3 |
| Descendant | article p | <p> inside <article> |
| Element+Class | p.intro | <p class="intro"> |
| Multiple Classes | .card.featured | Elements with both classes |
Common Mistakes to Avoid
Mistake 1: Missing Dot for Classes
/* ❌ Wrong - targets <card> element (doesn't exist) */
card {
  border: 1px solid #ddd;
}

/* ✅ Correct - targets class="card" */
.card {
  border: 1px solid #ddd;
}
Mistake 2: Missing Hash for IDs
/* ❌ Wrong - targets <header> element */
header {
  background: #1a1a1a;
}

/* ✅ Correct - targets id="header" */
#header {
  background: #1a1a1a;
}
Mistake 3: Space in Combined Selectors
/* ❌ Wrong - targets .intro INSIDE p */
p .intro {
  font-size: 1.2rem;
}

/* ✅ Correct - targets p with class intro */
p.intro {
  font-size: 1.2rem;
}
Practice Exercises
Try these on your own:
- Style all headings (h1-h3) with the same font family
- Create a
.btnclass with padding, background, and rounded corners - Style links inside a footer differently from other links
- Create an
#herosection with a background image
Practice makes perfect
The best way to learn selectors is to use them. Build small projects and experiment with different combinations.
Summary
| Concept | Symbol | Usage |
|---|---|---|
| Element | (none) | Base styles for tag types |
| Class | . | Reusable, multiple use |
| ID | # | Unique, single use |
| Group | , | Same styles for multiple selectors |
| Descendant | (space) | Target nested elements |
Key Takeaways
Remember These
- Selectors tell CSS what to style
- Element selectors style all elements of a type
- Class selectors (
.) are reusable across elements - ID selectors (
#) are for unique elements only - Descendant selectors target nested elements
- ID > Class > Element in priority
Conclusion
CSS selectors are the foundation of all styling. Without understanding selectors, you can't effectively style web pages.
Start with the basics:
- Element selectors for base styles
- Classes for reusable components
- IDs for unique sections
- Descendants for context-specific styling
Once you master these five selector types, you'll be ready to tackle more advanced concepts like pseudo-classes, attribute selectors, and combinators.
Now open your code editor and start selecting! 🎨
Have questions about CSS selectors? Drop a comment or reach out on Twitter @srtenginamath!

Written by Sharanayya R Tenginamath
Software Engineer at McD BERL with 4+ years building scalable full-stack applications with React.js, Next.js, TypeScript, FastAPI and Python. Available to join from Oct 12, 2026.
Related articles

- Web Development
- Browser
How a Browser Works: A Beginner-Friendly Guide to Browser Internals
Learn how browsers transform a URL into pixels on your screen. Understand DOM, CSSOM, rendering engines, and the complete journey from pressing Enter to seeing a webpage.
10 min read
- HTML
- Web Development
Understanding HTML Tags and Elements: A Complete Beginner's Guide
Learn the fundamentals of HTML tags and elements. Understand opening tags, closing tags, void elements, block vs inline elements, and commonly used HTML tags with practical examples.
10 min read
- JavaScript
- Async
JavaScript Promises : The Complete Guide to Async Code
Master JavaScript Promises from scratch — lifecycle, .then()/.catch()/.finally(), all static methods (all, allSettled, race, any), real-world examples, visual diagrams, and hands-on assignments. Written from 4+ years of full-stack development experience.
17 min read